
symbols
sl-st connecting stitch sc single crochet
ch – air song
hdc – half double crochet
dc – double crochet
inc inc bonus (knit 2 sc from one sc)
dec – decab (knit 1 sc behind the front half loop)
To create a toy, we will need leftover ink of different textures and colors, approximately 1025 g/
Silicone filler, buttons, foam balls, Kindersurinse container with buttons, large beads.
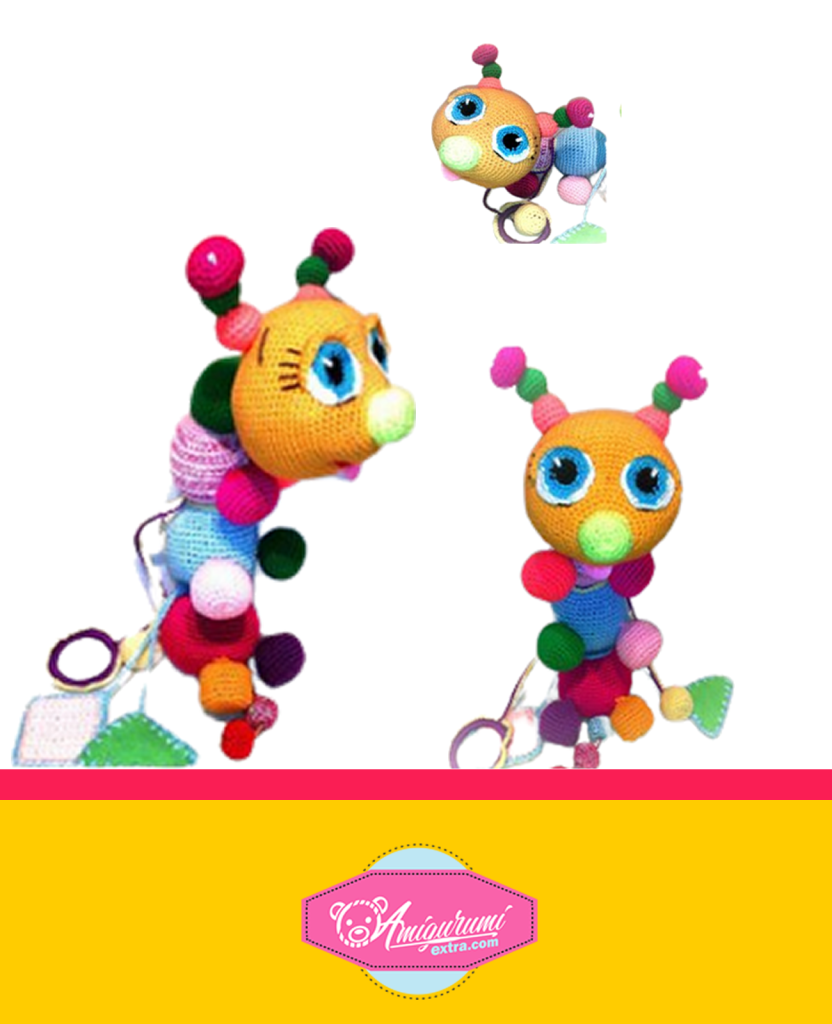
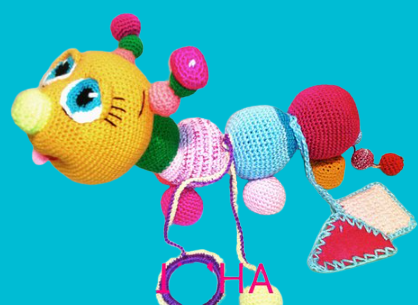
HEAD
Orange thread. (you can have any color you like)
1. 6sc into amigurumi ring
2.6 inc (12)
3. (1sc, inc) (18)
4. (2sc, inc) (24)
5. (3sc, inc) (30)
6. (4sc inc) (36)
7. (5sc, inc) (42)
8. (6 sc, inc) (48)
9. (7sc, inc) (54)
10. (8sc, inc) (60)
11. (9sc, inc) (66)
12. (10sc, inc) (72)
13.25. 72sc (13 rows)
26. (10 sc, dec) (66)
27. (9sc, dec) (60) stuff, then stuff as you knit. Now you can insert a Kindersurinse container with buttons inside. The head will sound like a rattle.
28. (8sc, dec) (54)
29. (7sc, dec) (48)
30. (6sc, dec) (42)
31. (5sc, dec) (36)
32. (4sc, dec) (30) change the thread to yellow
33.35. 30 sc (3 rows)
36. (3sc, dec) (24)
37. (2sc, dec) (18)
38. (1sc, dec) (12)
39. 6 dec (6) tighten the hole with a needle. Fasten the thread and cut it leaving for tightening. We determine where the neck will be attached, bring the needle with our thread there without tension, and secure it. Then we bring it out in the area where the other eye will be, lower one sc, insert the needle into the head and bring it out in the area of the left eye, lower it 1 sc, insert it into the head, bring it out in the neck area
tighten and secure the thread. We bring the needle out in the area of the corner of the mouth, lower it 1 sc, insert it into the head, lower it 10 sc and bring it out in the left corner of the mouth, pull it up, insert it into the inc corner of the mouth and bring it out in the left, repeat three times.
We bring out the thread in the neck area and tighten and secure it.
EYES 2pcs
Black thread.
Preferably floss or other thin thread. 1. 6sc per ring
2. 6 inc. (12) change the thread to gold
3. 1sc, inc) (18)
4. (2sc, inc) (24)
5. (sc, inc, 2sc) (30) change the thread to white
For left eye
6. 4sc, inc, 4sc, 10 sl-st for the back half-loop, 4sc, inc, 6sl-st for the back half-loop
Sl-st, 1ch, 5sc, sl-st. Fasten the thread and cut it. Leave the thread for incision, and use the same thread to embroider highlights on the pupils. 7. For the other eye
6. 3sc, inc, 6sl-st behind the back wall, inc 4c, 10 sl-st behind the back wall, 5sc 7. sl-st, 5 sc, 1ch, sl-st. Fasten the thread and cut it. Leave the thread for incision, and use the same thread to embroider highlights on the pupils.
EYELID 2pcs Orange thread
12 ch, in the 2nd from the hook I sing 3sc, 2hdc, 1dc, 2hdc, 3sc. Leave the thread for incision. HORNES 2pcs Orange thread
1. 6sc per ring
2. 6 inc. (12)
3. (1sc, inc) (18)
45. 18sc (2 rows)
6.(1sc, dec) (12)
7. 6 dec (6) replace the thread with green
8.6sc 9.6inc (12)
10. (1sc, inc) (18)
11. 12. 18sc (2 rows)
13.(1sc, dec) (12)
14. 6 Dec. (6) change the thread to crimson
15.6sc 16.6inc (12)
17. (1sc, inc) (18)
18. (2sc, inc) (24)
1921. 24 sc (3 rows)
22. (2sc, dec) (18)
23. (1sc, dec) (18)
24. 6 dec (6) tighten the hole with a needle. Cut the thread, leaving it for incision. Using a needle, we prick along the entire horn and bring the needle out at the base of the horn, secure the thread, then incise it to the head.
BODY
We start knitting from the tail with raspberry thread
1. 6sc into amigurumi ring
2.6 inc (12)
3. (1sc, inc) (18)
4. (2sc, inc) (24)
5. (3sc, inc) (30)
6. (4sc inc) (36)
7. (5sc, inc) (42)
8. (6 sc, inc) (48)
9. (7sc, inc) (54)
1019. 54 sc (10 rows)
20. (7sc, dec) (48)
21. (6sc, dec) (42)
22.(5sc, dec) (36)
23. (4sc, dec) (30) change the thread to gold. We stuff the tail. Repeat from row 6 to row 23 2 times!!!!!! In this case we change the thread twice. We fill the second ball with small buttons or beads, the third ball with foam balls.
The body is ready. Next we continue to knit the neck. We shift the beginning of the row so that it is in the middle of the left side part. I need to knit 6sc and put a marker, this will be the beginning of the row. 24. (4sc inc) (36)
25. (5sc, inc) (42)
26.(6 sc, inc) (48)
27. 24sl-st, 24 hdc 28. 48sc 29. 24sc, 24hdc 3031. 48 sc 32. 33. 22 sl-st, 24hdc, 2 sl-st 34. (6sc, dec) (42)
35. (5sc, dec) (36)
36. (4sc, dec) (30)
37. (3sc, dec) (24) Stuff the neck. Fasten the thread, cut it, leaving it for incision. Sew the body towards the head. Decorate the face by adding eyes and eyelids. Sew a felt tongue.
LEGS: 6 pcs Knit each leg in a different color. 1. 6sc per ring
2. 6 inc. (12)
3. (1sc, inc) (18)
4. (2sc ,inc) (24)
5. (3sc, inc) (30)
68. 30 sc (3 rows)
9.(3sc, dec) (24)
10. (2sc, dec) (18) Stuff. Or put in 4 large buttons. 11. (1sc, dec) (12)
12. 6 dec (6) Pull the hole with a needle. Fasten the thread, cut it, leaving it for incision. After incising, remove the ends of the thread of the back two legs from the middle of the ponytail. Attach three balls of a small tail to these threads. BALLS for little ones th tail. 3 pcs of different colors. 1. 6sc per ring
2. 6 inc. (12)
3. (1sc, inc) (18)
45. 18sc (2 rows)
6. (1sc, dec) (12)
7. 6 dec (6) Tighten the hole with a needle. Fasten the thread and cut it.
Using a needle, thread onto the threads left from incising the hind legs. After each ball, secure the thread with a knot. Leave a space of 1 cm between the balls. TRIANGLE
Cut two identical triangles from felt, of the desired size. You can sew it together with a gypsy needle with a large eye, or make holes along all the edges and then crochet sc along these holes. At the end, before the last sc, insert several large beads or buttons into the remaining hole. Make sure that the size of the bead is greater than the distance between sc. So that she couldn’t jump out. Make the last sc and secure the thread. Next, using the same thread, only in two folds (you can add a different color), we knit a tight chain of 40ch. We leave it like this for now, we will tie our square with this marriage.
SQUARE
1. 11ch, 2. in the second loop from the hook 10sc, 1ch, turn 315.10sc, 1ch, turn 16. 10sc. Thread Fasten the thread, cut it. Fold the resulting incagon in half. We tie sc. the thread left earlier from the triangle. So we will have two figures on one chain. You can fill the square at your discretion. I have a squeaker inside. You can use foil or foam balls.
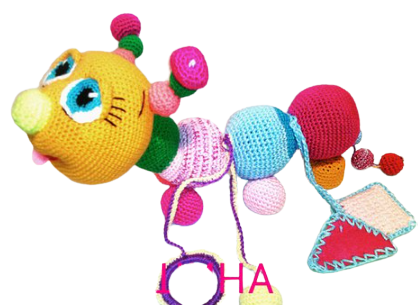
RING AND BALL
We tie the wooden ring tightly sc. We fasten the thread. Next, we knit 41ch into the last loop, we knit 6 sc, enclose them in a ring and knit them further as balls for the legs. Make sure that your ball fits through the ring. We knit, and then for reliability, we sew our developments to the body of the caterpillar. Our caterpillar development is all ready!
Your baby will be happy and satisfied. And you will have free time to drink tea